When you click on links to various merchants on this site and make a purchase, this can result in this site earning a commission. Affiliate programs and affiliations include, but are not limited to, the eBay Partner Network.
Price: $45.90
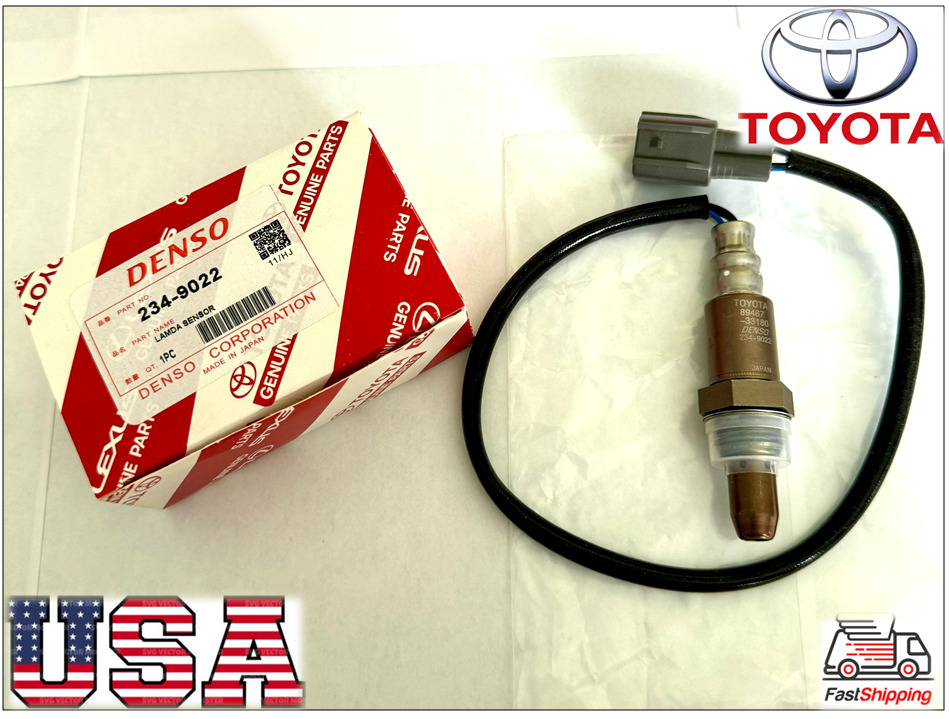
OEM DENSO234-9022 Fuel To Air Ratio Sensor For Lexus ES350 RX350 Toyota 3.5L Upstream
FAST SHIPPING FREE (SAME DAY)
SEND ME VIN NUMBER FOR CHECK COMPATIBILITY
ItemCondition:
Brand New oxygen sensor (Made in Japan)
Item Description:
Brand NewOxygen Sensor OEM STYLE
Manufacturer Part Number: 234-9022
Denso Oem "first time fit" planar air fuel sensor, originalequipment direct plug in, no wire cutting
INTERCHANGE:
- NTK:24827
- Toyota:894670R020
- Walker Products:250-54059
- Bosch:15962
- Toyota:8946733180
- Bosch:13735
- Toyota:8946742090
- Toyota:8946707040
- Toyota:8946704070
- Bosch:18018
- Walker Products:350-64070
- Toyota:8946760050
- Toyota:894670E040
- Delphi:ES10934
- Toyota:8946742120
- Toyota:8946748130
APPLICATIONS:
- 2010-2010 Toyota 4Runner -Position:Upstream
- 2011-2012 Toyota Tacoma -Position:Upstream
- 2012-2012 Toyota RAV4 -Position:Upstream
- 2008-2010 Toyota Highlander -Position:Upstream Right
- 2009-2011 Toyota Venza -Position:Upstream Right
- 2011-2011 Toyota Sienna -Position:Upstream Right
- 2008-2009 Lexus RX350 -Position:Upstream Right
- 2009-2011 Toyota RAV4 -Position:Upstream
- 2007-2007 Lexus RX350 -Position:Upstream Right
- 2010-2010 Lexus RX450h -Position:Upstream Right
- 2008-2011 Toyota Camry -Position:Upstream Right
- 2012-2012 Toyota RAV4 -Position:Upstream
- 2008-2011 Lexus ES350 -Position:Upstream Right
- 2006-2012 Toyota RAV4 -Position:Upstream Right
- 2008-2011 Toyota Avalon -Position:Upstream Right
FEATURES & BENEFITS
Air/Fuel Sensor
- AF Sensor, Air-Fuel Sensor, AFR Sensor, Oxygen Sensor, O2 Sensor, Wideband Sensor, Male
- Air-Fuel Ratio Sensor 4 Wire, Direct Fit, Heated, Wire Length: 13.39 inches
Double Protection Cover -Maintains Proper Unit Temperature For Quicker Response Times & Protects TheCeramic Element Against Silicone & Lead Poisoning
- Stainless Steel Housing - Resists Corrosion & Contamination w/ A Rugged, Watertight Body.
- Aluminum-Oxide Trap Layer - Keeps Silicone & Lead Outside The Ceramic Element Through Denso's Exclusive Design, Preventing Damage To The Platinum
- Screw Type
- Porous PTFE Filter - Allows Atmospheric Oxygen To Enter The Sensor w/o Permitting Water Or Engine Contaminants To Seep Into The Casing.
- M18
PLEASE CHECK YOUR CAR ON THE CATALOG BEFORE YOUR PURCHASE:
Http://carid.com/images/denso/emission-control/catalog/o2af-cat-0216-o2af-sensor-us-epaperflip-catalog.pdf
Q: How do I know the O2sensor is good or not?
A:The only way to know if the O2 sensor isfunctioning normally is to check its responsiveness to changes in the air/fuelmixture, by Voltage Measurement or Waveform Simulation.
Q: How to replace an oxygen sensor?
A: Replacing anoxygen sensor may sound like a complicated task, but with the right tools and abit of know-how, it’s a job that almost anyone can do in their own garage. Hereare the general steps for replacing an oxygen sensor.
1. LOCATE THEOXYGEN SENSORThe first step is to locate the oxygen sensor youneed to replace. Most modern vehicles have at least two oxygen sensors, oneupstream and one downstream of the catalytic converter. Be sure to double-checkthat you have the right one. 2. REMOVE THEOLD OXYGEN SENSOR
Once you’ve located the oxygen sensor, you’ll needto remove it. This can be the most challenging part of the job, as oxygensensors can become corroded and difficult to remove. You should use a wrench ora specializedoxygen sensor socketto remove the sensor. Be careful not to damage the sensor’s wiringduring removal.3. INSTALL THENEW OXYGEN SENSOR
With the old oxygen sensor removed, it’s time toinstall the new one. Take care to install the new sensor in exactly the samelocation and orientation as the old one. You should tighten the new oxygensensor to the manufacturer’s recommended torque settings.4. RECONNECTTHE WIRINGOnce the new oxygen sensor is in place, reconnect the wiring. Make surethe connections are tight and secure, and that the wiring is routed correctly.5. CLEAR THETROUBLE CODE
After installing the new oxygen sensor, you’ll needto clear the trouble code. You can do this by disconnecting the battery for afew minutes or using a scan tool. This will reset the vehicle’s computer andallow it to start collecting new data from the new oxygen sensor.
SHIPPING
1. Ordersprocessed within 12 hours of payment verification.
2.We only ship to confirmed PAYPAL addresses.Your PAYPAL address must match your Shipping address.
3. The images shown are the actual item.
4. Service transit time is provided by the carrier and excludes weekends andholidays. Transit times may vary, particularly during the holiday season.
5.If you have notreceived your shipment within 28 days from payment, please contact us. Wewill track the shipment and get back to you as soon as possible with a reply. Ourgoal is customer satisfaction!
FEEDBACK
We maintainhigh standards of excellence (five stars review) and strive for 100% customersatisfaction!FEEDBACK IS VERYIMPORTANT TO US.Werequest that you contact us immediately BEFORE you give us neutral or negativefeedback, so that we can satisfactorily address your concerns.