When you click on links to various merchants on this site and make a purchase, this can result in this site earning a commission. Affiliate programs and affiliations include, but are not limited to, the eBay Partner Network.
Price: $65.26
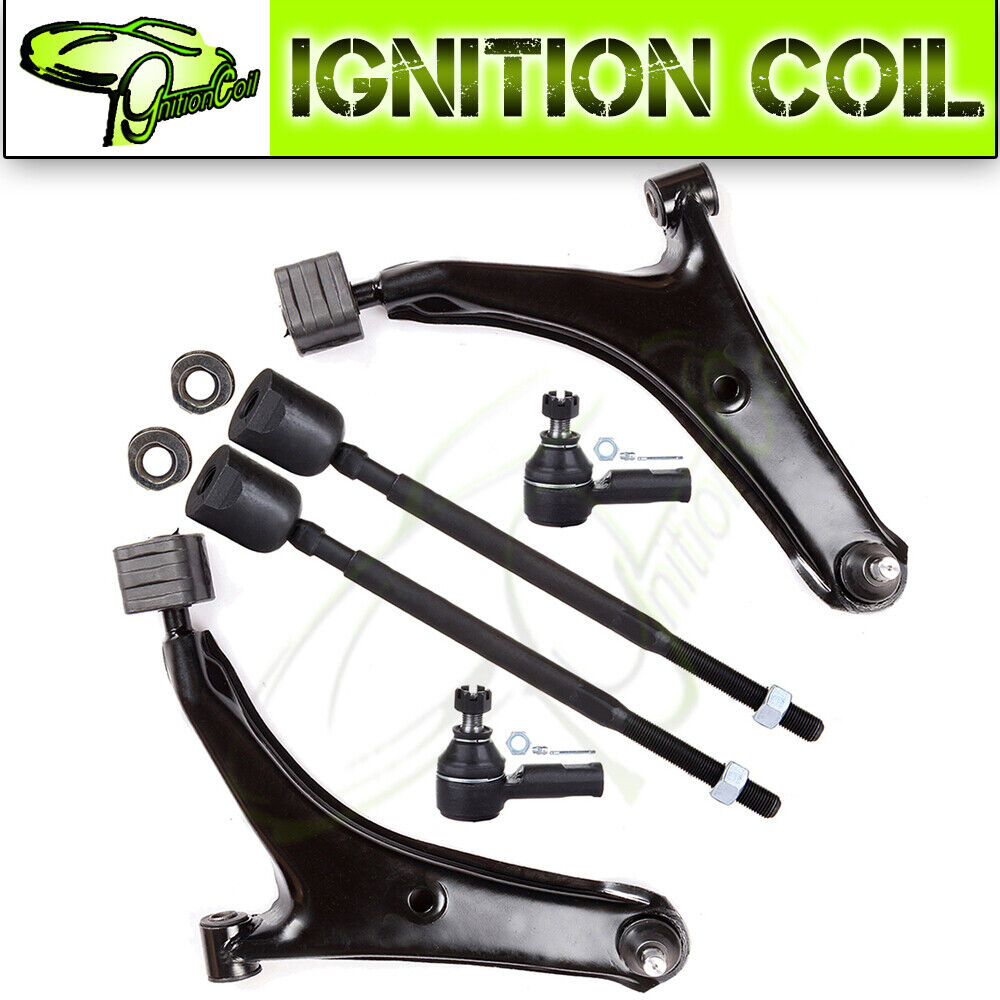
1.Fit For:
1995-1997 Geo Metro
2.Package Includes:
1x Front Lower Control Arm And Ball Joint - Passenger Side -K6203041x Front Lower Control Arm And Ball Joint - Driver Side -K6203032x Front Outer Tie Rod End -ES3043RL2x Front Inner Tie Rod End -EV269
Notes
(1).Please check the fitment chart above before payment makingsure all the suspension parts listed on this page are compatible with your automobile.
(2).Please refer to Moog official website before narrowing down your search so as to avoid unnecessary item not as described return requests.
(3).Please contact our customer services for targeted discount after all the items are received if you have reached any targeted discount thresholds, the terms of which is atthe bottom of thispage.
If you are interested with anyothersuspension parts, please click and saveour store.
Control Arm Bushing Replacement Reference:
Control arms themselves do not generally wear out, but the control arm bushings and ball joints do, so you will likely need to remove them to service those components. Yet, some OEMs or parts suppliers do not sell bushings and ball joints separately, so you may have to purchase the entire control arm and replace it as a unit. Also, control arms can become bent or damaged as the result of a collision or driving through a deep pothole, so control arms do need to be inspected for damage. Many control arms are now made from forged or sintered aluminum, so you may need to measure for damage or check it on an alignment machine.
Picture(A)
1.Remove the coil spring and steering knuckle by following the steps in previous skill drills.
2.Loosen the bolts holding the upper control arm in place. Note that there might be shim packs held in by the bolts. If so, tape them together in their packs, and label their positions.
Picture(B)
3.Remove the lower control arm by removing the bolts holding it in place. As you dismantle the system components, carry out a constant inspection of the parts being removed. Doing so will aid you when you need to order replacement parts. You should also mark mating parts with white paint to aid in reassembly.
Picture(C)
4.Inspect the upper and lower control arm for wear or damage. If the control arm bushings show signs of excessive wear or deterioration of the bushing material, they will have to be replaced.
5.Replace the worn bushings in the upper and/or lower control arm. Replacement of control arm bushings can be performed two ways—with a hydraulic press with correctly sized press tools or with an air chisel. Be careful using an air chisel: Damage to the control arm can result, such as gouging the mounting surface of the bushing if you slip with the chisel.
Picture(D)
6.Press method: Place the control arm in a hydraulic press supported so the bushing is level to the press head. Using the correct-sized adapter, press the bushing out.
Picture(E)
7.Using the press, install the new bushing into the control arm. Be careful to start the bushing in straight, or you could bend the control arm. Press it in until the flange bottoms out.
Picture(F)
8.Air chisel method: Install the control arm in a vise. Use an air chisel to work the bushing out. Be careful not to gouge the mating surface of the control arm.
Picture(G)
9.Using the air hammer, drive the new bushing into place, making sure it is fully seated.
Frequently Asked Questions
(1).Do I need to replace the control arm if the bushings are worn?
Because the weight of the car is transferred through the control arm two rubber bushings are fitted at the pivot point and bolted to the frame. Road conditions and driving habits can contribute to the wear of these bushings which will become worn and fall apart. These bushing can be inspected by raising the car up and looking for an irregular configuration of the rubber center of the bushing. Many control arms have the ball joint manufactured into the arm which will be replaced along with the control arm itself. When one control arm is worn it is highly advised to replace the opposing arm.
Tie Rod End Removing Guideline:
Tie rods make the final connection between the steering linkage and the steering arms. The point of connection with the steering linkage is considered the inner tie-rod end, and the end that connects to the steering arm is considered the outer tie-rod end. Checkingtie rods is important in identifying steering problems because the ends are frequently damaged or worn. There are two basic types of tie-rod ends: spring loaded and preloaded. Each type has its own procedure for inspection and replacement of the ends. Replacement of tie-rod ends requires an alignment to be performed, or rapid tire wear will occur.
Picture(A)
1.Safely raise the vehicle on a lift.
2.Inspect the rubber bellows for any signs of leaks, tears, or damage.
3.With the vehicle raised, have an assistant turn the steering wheel to one side or the other and rock the steering wheel from side to side.
4.On the side farthest out, squeeze the bellows until you make contact with the inner ball joint, and feel for any play in the inner tie-rod joint.
5.Repeat this procedure for the other side.
6.If play is found, replacement of the inner tie-rod ends will be necessary.
Picture(B)
7.Remove the front wheel for the side being replaced, and loosen the locknut on the tie-rod end.
Picture(C)
8.Remove the cotter pin and nut holding the outer tie-rod endto the steering arm, and separate the tie-rod end from the knuckle, using a tie-rod removal tool, the double hammer method, or a pickle fork.
Picture(D)
9.Count the number of turns to remove the outer tie-rod end from the threaded sleeve.
Picture(E)
10.Remove the spring clamp from the bellows boot end to the inner tie-rod shaft, and remove the crimp clamp from the bellows boot to the rack-and-pinion housing. A new crimp clamp will have to be used on replacement of the boot.
Picture(F)
11.Remove the bellows boot.
12.Using an inner tie-rod tool and the specified wrench to hold the rack, loosen the inner tie rod from the rack, and remove the inner tie-rod end.
Picture(G)
13.Install the new inner tie rod in reverse order of removal, and verify that the play is gone.
14.Perform alignment to reset toe after replacement is performed.
15.Test drive to verify repair.
Frequently Asked Questions
(1).Why should I get my tie rods inspected on a regular basis?
If you don't get your tie rods inspected on a regular basis, there are some warning signs to watch (and listen) for. If your vehicle pulls to one side while driving, or when braking, it's possible that bad tie rods may be the culprit. Your vehicle's tires will also show uneven wear on the inside and outside edge of the tire when there's a tire rod issue. However, one of the most noticeable signs of tie rods going bad will be a knocking sound coming from the front end of the vehicle when you turn into a parking space, or some other low speed, tight turning situation.
(2).Vibrations
One of the first symptoms that your tie rods are damaged or breaking is that the steering wheel will vibrate slightly. This is especially prevalent when you are speeding up or turning. This happens because the steering wheel is losing its control over the tires, causing the steering wheel to shimmy as you drive.
(3).Shaking
As the tie rods become further damaged, you will start to notice that the car itself will start to shake. This happens because the tires may start to wobble without you having full control over them. Although you should take your car into a mechanic at the first sign of tie rod problems, if you experience your car shaking you could be at risk for serious tie rod damage-which can cause accidents. Take your car into a mechanic if you experience this tie rod symptom.
(4).Wandering
If your tie rods continue to go unchecked or unfixed, the rods can completely break. This can cause you to lose all control of your car, possibly resulting in an accident. When this occurs, the car will may "wander" as you drive. At this point, the steering wheel will have no control over the tires and the tires will start moving independently, causing the car to drift while you are driving. If this happens while you are on a freeway or busy road, you and others could be at serious risk of an accident. If you experience wandering, stop your car, call a tow truck and take your car to the nearest mechanic.
Item SpecificsBrand :VAP-autopartsManufacturer Part Number :VAP80190001LManufacturer Warranty :2 YearUniversal Fitment :NoFeatures :GreasablePlacement on Vehicle :FrontItems Included :Mounting HardwarePerformance Part :NoKit Parts Included :Control Arm,Tie Rod EndType :Tie Rod EndInterchange Part Number :K620304,K620303,ES3043RL,EV269Superseded Part Number :suspension control arm car,replacing control arm ball jointOE/OEM Part Number :car tie rod end replacement,inner and outer tie rod end,rods endsCotter Pin Hole :YesMaterial :Alloy SteelMounting Style :Bolt-OnFinish :Coated
Shipping WARNING: Cancer and Reproductive Harm - www.P65Warnings.ca.govProposition 65 requires businesses to provide warnings to Californians about significant exposures to chemicals that cause cancer, birth defects or other reproductive harm.(1).Warehouse is located in Los Angeles, California, where local pickup transaction is temporarily not available.(2).Shipping services only cover 48 states and Washington DC in US Continental, while most of the time Alaska, Hawaii, Puerto Rico, American Samoa, U.S. Virgin Islands, Northern Marianas, Guam are not deliverable.(3).USPS PO Box, APO Army Post Office, FPO Fleet Post Office addresses are not available.(4).Global Shipping Program is temporarily not available due to the reason for package dimensions.(5).We usually need a 1-2business day as handling time for packaging and shipping scheduling. Estimated delivery dates should be 4-6business days after your payment is received.(6).Your auto parts sometimes might be shipped with two or more separated packages due to weight limitation, please keep patient with no Item Not Received claim or Return request filed until by all of your items are received.(7).Seller is required to purchase signature confirmation to be protected if a buyer reports an item not received or opens a payment dispute if the order has a total cost (including shipping costs and any taxes) of $750 or more.Warranty Items valued over $15 on eBay that include a warranty or service contract must contain additional details in seller's listing description.10 Year Warranty Terms and Procedures(1).The warranty terms only apply to all the auto parts purchased from VAP-AUTOPARTS.(2).VAP-AUTOPARTS carries no warranty responsibilities for any auto parts removing fees, installation fees, consulting fees, labor costs, towing charges, rental car reimbursements.(3).The stated 10 year warranty is limited to only one brand new replacement for each part purchased during 10 year warranty time period.(4).VAP-AUTOPARTS promises free replacement due to quality defects or item not as described issues within 90 calendar days from the date when buyers receive their items in the situation when buyers are willing to provide convictive proofs or professional diagnose report if required, otherwise VAP-AUTOPARTS has the right to refuseany replacement requests.(5).VAP-AUTOPARTS promises free replacement due to quality defects or item not as described issues after 90 calendar days from the date when buyers receive their items in the situation when buyers promise to prepay 15% of the original item sales price as postage for replacement, otherwise VAP-AUTOPARTS has the right to refuseany replacement requests.(6).VAP-AUTOPARTS carries no warranty responsibilities for any replacement due to car accidents, drag racing, unprofessional replacement, road hazard, disassembly.(7).Anyone who attempts to execute 10 year warranty procedures must be the original purchaser of the item(s), otherwise 10 year warranty terms void immediately.(8).Anyone who attempts to execute 10 year warranty procedures must provide screenshot of his or her original eBay order details if required, including buyer user name, shipping address, item title, item id, final sales price.(9).VAP-AUTOPARTS has the final power of interpretation of the above 10 Year Warranty Terms and Procedures.Return (1).Most of items support 60 Days Money Back Guarantee.(2).Refunds will be credited within 2 or 3 business days after returned item(s) is received. Best Sales For Chevrolet Silverado GMC Sierra 1500 4.8L 5.3L 2006-2000 Square Ignition Coil USD 60.99 4PCS Ignition Coil For Toyota Camry RAV4 Highlander Solara Scion 2.4L UF333 USD 33.99 6x Ignition Coils for Nissan Frontier Pathfinder Altima Maxima 3.5L 4.0L UF349 USD 44.99 For Ford Ranger 2.3L 2.5L F150 Expedition Lincoln Mercury FD487 Ignition Coil USD 25.99 4x Ignition Coil For 00-08 Toyota Corolla Celica Matrix 1.8L UF247 90919-02339 USD 34.99 Newly Listed Fit Toyota Tundra/Sequoia Clear Lens Bumper Fog Lights Lamps W/Switch USD 21.89 85330-50030 Windshield Washer Pump for Toyota Camry Land Cruiser Matrix 1pcs USD 8.19 Front Brake Creamic Pads For 2008-2012 Ford Escape Hybrid Low Noise 4pcs USD 28.23 pair Fog Light Fit For Ford for 2015 - 2020 F150 Assembly Kit Plastic USD 51.99 For 2000-2002 Sentra SE Nissan Infiniti G20 2.0L Engine Oil Pan USD 17.99 Terms & ContactShipping PolicyPayment PolicyReturn PolicyFAQAbout Us Front Lower Control Arm Ball Joint & Tie Rod End For 1995 96 1997 Geo Metro
1.Fit For:
1995-1997 Geo Metro
2.Package Includes:
1x Front Lower Control Arm And Ball Joint - Passenger Side -K6203041x Front Lower Control Arm And Ball Joint - Driver Side -K6203032x Front Outer Tie Rod End -ES3043RL2x Front Inner Tie Rod End -EV269
Notes
(1).Please check the fitment chart above before payment makingsure all the suspension parts listed on this page are compatible with your automobile.
(2).Please refer to Moog official website before narrowing down your search so as to avoid unnecessary item not as described return requests.
(3).Please contact our customer services for targeted discount after all the items are received if you have reached any targeted discount thresholds, the terms of which is atthe bottom of thispage.
If you are interested with anyothersuspension parts, please click and saveour store.
Control Arm Bushing Replacement Reference:
Control arms themselves do not generally wear out, but the control arm bushings and ball joints do, so you will likely need to remove them to service those components. Yet, some OEMs or parts suppliers do not sell bushings and ball joints separately, so you may have to purchase the entire control arm and replace it as a unit. Also, control arms can become bent or damaged as the result of a collision or driving through a deep pothole, so control arms do need to be inspected for damage. Many control arms are now made from forged or sintered aluminum, so you may need to measure for damage or check it on an alignment machine.
Picture(A)
1.Remove the coil spring and steering knuckle by following the steps in previous skill drills.
2.Loosen the bolts holding the upper control arm in place. Note that there might be shim packs held in by the bolts. If so, tape them together in their packs, and label their positions.
Picture(B)
3.Remove the lower control arm by removing the bolts holding it in place. As you dismantle the system components, carry out a constant inspection of the parts being removed. Doing so will aid you when you need to order replacement parts. You should also mark mating parts with white paint to aid in reassembly.
Picture(C)
4.Inspect the upper and lower control arm for wear or damage. If the control arm bushings show signs of excessive wear or deterioration of the bushing material, they will have to be replaced.
5.Replace the worn bushings in the upper and/or lower control arm. Replacement of control arm bushings can be performed two ways—with a hydraulic press with correctly sized press tools or with an air chisel. Be careful using an air chisel: Damage to the control arm can result, such as gouging the mounting surface of the bushing if you slip with the chisel.
Picture(D)
6.Press method: Place the control arm in a hydraulic press supported so the bushing is level to the press head. Using the correct-sized adapter, press the bushing out.
Picture(E)
7.Using the press, install the new bushing into the control arm. Be careful to start the bushing in straight, or you could bend the control arm. Press it in until the flange bottoms out.
Picture(F)
8.Air chisel method: Install the control arm in a vise. Use an air chisel to work the bushing out. Be careful not to gouge the mating surface of the control arm.
Picture(G)
9.Using the air hammer, drive the new bushing into place, making sure it is fully seated.
Frequently Asked Questions
(1).Do I need to replace the control arm if the bushings are worn?
Because the weight of the car is transferred through the control arm two rubber bushings are fitted at the pivot point and bolted to the frame. Road conditions and driving habits can contribute to the wear of these bushings which will become worn and fall apart. These bushing can be inspected by raising the car up and looking for an irregular configuration of the rubber center of the bushing. Many control arms have the ball joint manufactured into the arm which will be replaced along with the control arm itself. When one control arm is worn it is highly advised to replace the opposing arm.
Tie Rod End Removing Guideline:
Tie rods make the final connection between the steering linkage and the steering arms. The point of connection with the steering linkage is considered the inner tie-rod end, and the end that connects to the steering arm is considered the outer tie-rod end. Checkingtie rods is important in identifying steering problems because the ends are frequently damaged or worn. There are two basic types of tie-rod ends: spring loaded and preloaded. Each type has its own procedure for inspection and replacement of the ends. Replacement of tie-rod ends requires an alignment to be performed, or rapid tire wear will occur.
Picture(A)
1.Safely raise the vehicle on a lift.
2.Inspect the rubber bellows for any signs of leaks, tears, or damage.
3.With the vehicle raised, have an assistant turn the steering wheel to one side or the other and rock the steering wheel from side to side.
4.On the side farthest out, squeeze the bellows until you make contact with the inner ball joint, and feel for any play in the inner tie-rod joint.
5.Repeat this procedure for the other side.
6.If play is found, replacement of the inner tie-rod ends will be necessary.
Picture(B)
7.Remove the front wheel for the side being replaced, and loosen the locknut on the tie-rod end.
Picture(C)
8.Remove the cotter pin and nut holding the outer tie-rod endto the steering arm, and separate the tie-rod end from the knuckle, using a tie-rod removal tool, the double hammer method, or a pickle fork.
Picture(D)
9.Count the number of turns to remove the outer tie-rod end from the threaded sleeve.
Picture(E)
10.Remove the spring clamp from the bellows boot end to the inner tie-rod shaft, and remove the crimp clamp from the bellows boot to the rack-and-pinion housing. A new crimp clamp will have to be used on replacement of the boot.
Picture(F)
11.Remove the bellows boot.
12.Using an inner tie-rod tool and the specified wrench to hold the rack, loosen the inner tie rod from the rack, and remove the inner tie-rod end.
Picture(G)
13.Install the new inner tie rod in reverse order of removal, and verify that the play is gone.
14.Perform alignment to reset toe after replacement is performed.
15.Test drive to verify repair.
Frequently Asked Questions
(1).Why should I get my tie rods inspected on a regular basis?
If you don't get your tie rods inspected on a regular basis, there are some warning signs to watch (and listen) for. If your vehicle pulls to one side while driving, or when braking, it's possible that bad tie rods may be the culprit. Your vehicle's tires will also show uneven wear on the inside and outside edge of the tire when there's a tire rod issue. However, one of the most noticeable signs of tie rods going bad will be a knocking sound coming from the front end of the vehicle when you turn into a parking space, or some other low speed, tight turning situation.
(2).Vibrations
One of the first symptoms that your tie rods are damaged or breaking is that the steering wheel will vibrate slightly. This is especially prevalent when you are speeding up or turning. This happens because the steering wheel is losing its control over the tires, causing the steering wheel to shimmy as you drive.
(3).Shaking
As the tie rods become further damaged, you will start to notice that the car itself will start to shake. This happens because the tires may start to wobble without you having full control over them. Although you should take your car into a mechanic at the first sign of tie rod problems, if you experience your car shaking you could be at risk for serious tie rod damage-which can cause accidents. Take your car into a mechanic if you experience this tie rod symptom.
(4).Wandering
If your tie rods continue to go unchecked or unfixed, the rods can completely break. This can cause you to lose all control of your car, possibly resulting in an accident. When this occurs, the car will may "wander" as you drive. At this point, the steering wheel will have no control over the tires and the tires will start moving independently, causing the car to drift while you are driving. If this happens while you are on a freeway or busy road, you and others could be at serious risk of an accident. If you experience wandering, stop your car, call a tow truck and take your car to the nearest mechanic.
ShippingWarrantyReturnDiscountSales Tax WARNING: Cancer and Reproductive Harm - www.P65Warnings.ca.govProposition 65 requires businesses to provide warnings to Californians about significant exposures to chemicals that cause cancer, birth defects or other reproductive harm.(1).Warehouse is located in Los Angeles, California, where local pickup transaction is temporarily not available.(2).Shipping services only cover 48 states and Washington DC in US Continental, while most of the time Alaska, Hawaii, Puerto Rico, American Samoa, U.S. Virgin Islands, Northern Marianas, Guam are not deliverable.(3).USPS PO Box, APO Army Post Office, FPO Fleet Post Office addresses are not available.(4).Global Shipping Program is temporarily not available due to the reason for package dimensions.(5).We usually need a 1-2business day as handling time for packaging and shipping scheduling. Estimated delivery dates should be 4-6business days after your payment is received.(6).Your auto parts sometimes might be shipped with two or more separated packages due to weight limitation, please keep patient with no Item Not Received claim or Return request filed until by all of your items are received.(7).Seller is required to purchase signature confirmation to be protected if a buyer reports an item not received or opens a payment dispute if the order has a total cost (including shipping costs and any taxes) of $750 or more. Items valued over $15 on eBay that include a warranty or service contract must contain additional details in seller's listing description.10 Year Warranty Terms and Procedures(1).The warranty terms only apply to all the auto parts purchased from VAP-AUTOPARTS.(2).VAP-AUTOPARTS carries no warranty responsibilities for any auto parts removing fees, installation fees, consulting fees, labor costs, towing charges, rental car reimbursements.(3).The stated 10 year warranty is limited to only one brand new replacement for each part purchased during 10 year warranty time period.(4).VAP-AUTOPARTS promises free replacement due to quality defects or item not as described issues within 90 calendar days from the date when buyers receive their items in the situation when buyers are willing to provide convictive proofs or professional diagnose report if required, otherwise VAP-AUTOPARTS has the right to refuseany replacement requests.(5).VAP-AUTOPARTS promises free replacement due to quality defects or item not as described issues after 90 calendar days from the date when buyers receive their items in the situation when buyers promise to prepay 15% of the original item sales price as postage for replacement, otherwise VAP-AUTOPARTS has the right to refuseany replacement requests.(6).VAP-AUTOPARTS carries no warranty responsibilities for any replacement due to car accidents, drag racing, unprofessional replacement, road hazard, disassembly.(7).Anyone who attempts to execute 10 year warranty procedures must be the original purchaser of the item(s), otherwise 10 year warranty terms void immediately.(8).Anyone who attempts to execute 10 year warranty procedures must provide screenshot of his or her original eBay order details if required, including buyer user name, shipping address, item title, item id, final sales price.(9).VAP-AUTOPARTS has the final power of interpretation of the above 10 Year Warranty Terms and Procedures. (1).Most of items support 60 Days Money Back Guarantee.(2).Refunds will be credited within 2 or 3 business days after returned item(s) is received.
Copyright of vap-autoparts. All rights reserved.