When you click on links to various merchants on this site and make a purchase, this can result in this site earning a commission. Affiliate programs and affiliations include, but are not limited to, the eBay Partner Network.
Price: $41.89
- Built to meet or exceed original equipment performance
- Simple electrical plug assembly, no wire splicing necessary
- High-quality steel and plastic compounds for greater durability
Description
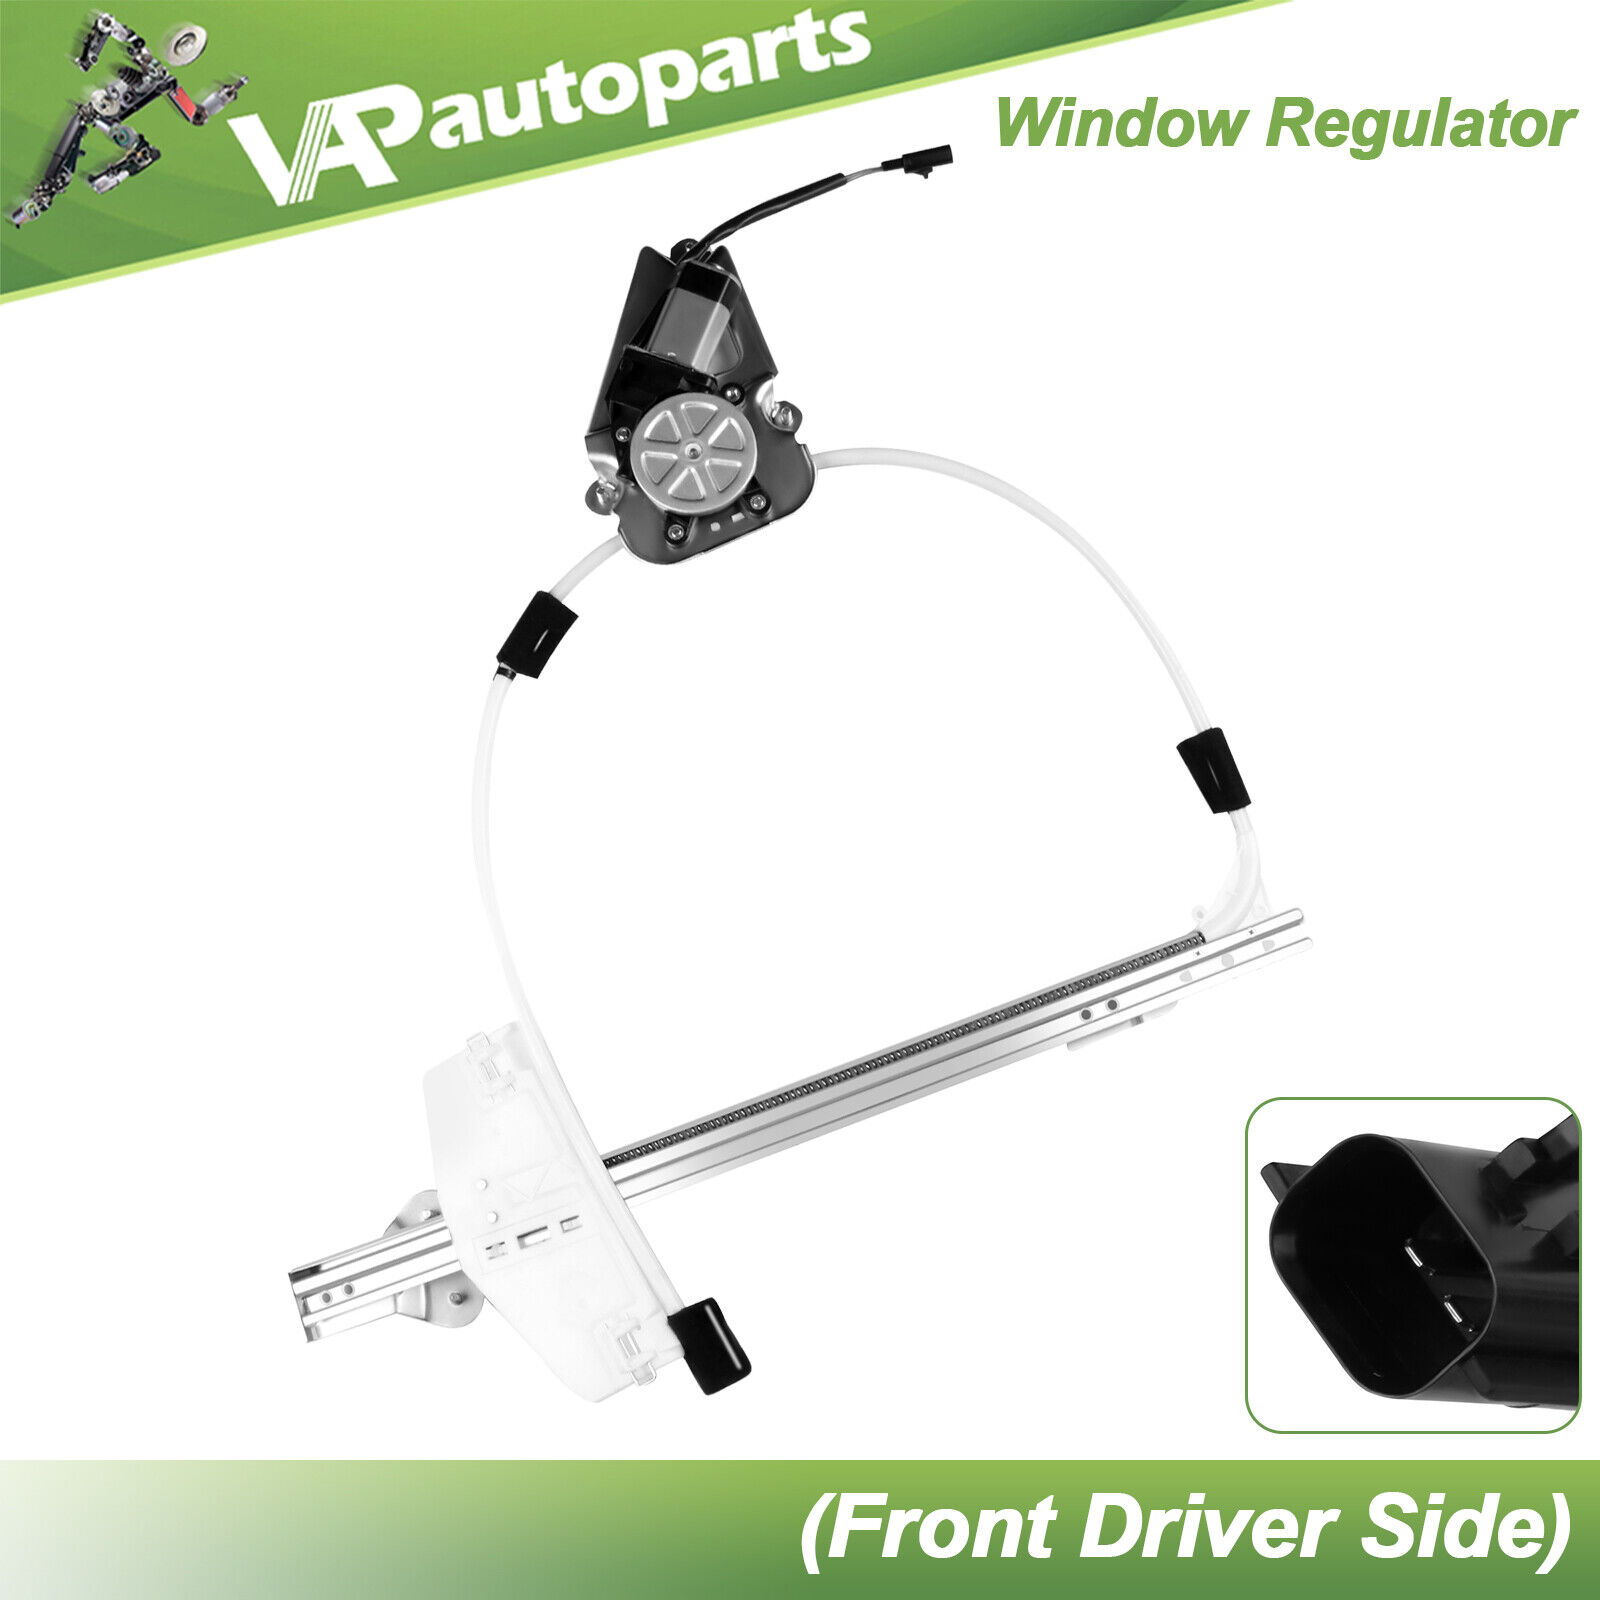
Our window regulator offer value without compromising quality. It with premium material and solid construction, ensures high strength and reliability. They direct fit -No missing holes, hardware or mounting brackets. It has been 100% tested for RPM, rotational direction, amperage and torque before shipment.
Highlights include
- Built to meet or exceed original equipment performance
- Simple electrical plug assembly, no wire splicing necessary
- High-quality steel and plastic compounds for greater durability
Your "Right Part" Checklist
Use the compatibility chart to identify your vehicle.
Visually compare the part you are replacing with our pictures.
Match reference numbers from the Item specifics section above.
Find the year,make, model, engine and trim in vehicle application to ensure.
Part Number
Replaces dealer part number:741-526, 68059644AA, 55360031AB, 55360031AG, 55360031AH, 55360031AJ, 55360031AM
Fitting for the following vehicles
2007 Jeep Liberty Front Left Ball Stud Style, Regulator Attaches To Metal Liftplate w/Spring Clip
2006 Jeep Liberty Front Left Ball Stud Style, Regulator Attaches To Metal Liftplate w/Spring Clip
2005 Jeep Liberty Front Left
2004 Jeep Liberty Front Left
2003 Jeep Liberty Front Left
2002 Jeep Liberty Front Left
Package
1x Window regulatorwith Motorin a box
Install the window regulator as follows:
Tools required for removal and installation of window regulator and motor assembly:
• Silicone spray lubricant
• Trim panel removal tool
• Pick
• Saddle cup assembly, tape, or wedge to hold window in place
• Flat-blade screwdriver or plastic pry tool
• 10mm socket or driver
• Phillips screwdriver
• Grease pencil or marker
Removal Instructions
STEP 1: Using a Phillips head screwdriver, remove the interior door trim panel retaining screw.
STEP 2: Using a pic or small fl at-blade screwdriver, remove the cover exposing an interior door trim panel attaching screw.Once the cover has been removed, use a Phillips head screw driver to remove the interior door trim panel attaching screw.
STEP 3: Using a trim panel removal tool, release the interior door trim panel retainers.
NOTE: The interior door trim panel retainers are about 8 inches apart from each other.
STEP 4: Once the interior door trim panel has been released, disconnect the interior door latch rod from the interior door handle.
STEP 5: Disconnect the power door lock switch assembly.
STEP 6: Remove the interior door trim panel.
STEP 7: Using a Phillips head screw driver, remove the three (3) door speaker attaching screws.
STEP 8: Disconnect the door speaker.
STEP 9: Remove the interior water vapor barrier.
STEP 10: Temporarily connect the power window master switch and lower the window glass to expose the two (2) window glass mounting bolts.
STEP 10a: Remove the two (2) window glass mounting bolts and manually slide the window glass into the up position. Hold the window glass in place with either saddle cup assembly, painter’s tape, or wedge.
STEP 10b: Disconnect the window lift motor connector.
STEP 11: Remove the bottom two (2) regulator attaching bolts.
STEP 12: Remove the upper regulator attaching bolt.
STEP 13: Once the window regulator attaching hardware has been removed, remove the window regulator assembly through the access hole.
Installation Instructions
STEP 1: Place the window regulator through the access hole.
STEP 2: Loosely mount the bottom of the window regulator into position.
STEP 3: Loosely mount the top of the window regulator into position.
STEP 4: Once the window regulator has been put into position, tighten the window regulator attaching bolts.
STEP 4a: Connect the window lift motor connector.
STEP 5: Manually slide the window glass down to attach to the window regulator.
NOTE: It may be necessary to temporarily connect the master power switch assembly to raise or lower the window regulator lift plate.
STEP 6: Install the water vapor barrier.
NOTE: Be sure to slide the interior door latch rod through the water vapor barrier.
STEP 7a: Attach the three (3) door speaker attaching screws.
STEP 8: Attach the interior door latch rod to the interior door handle.
STEP 9: Connect the power door lock switch.
STEP 10: Install the interior door trim panel. NOTE: Be sure to align all of the door trim panel retainers.
STEP 11: Install the interior door trim panel door handle bezel retaining screw.
STEP 12: Install the interior door trim panel door pull retaining screw.
STEP 13: Verify that the interior door trim panel is securely fastened and that the window regulator operates properly.
Warranty:
This product is covered by our1-yearwarranty.
If a failure occurs due to a manufacturing defect during the expected use, we will replace the part free of charge
Item SpecificsBrand ignitioncoManufacturer Part Number VA10609901pPlacement on Vehicle Front LeftType Regulator & Motor AssemblyOperating Mode ElectricMotor Included YesOE/OEM Part Number 741-526Custom Bundle NoPackage Contents 1 Power Window RegulatorPackaging Type BoxManufacturer Warranty 1 YearFit for 02-07 Liberty Jeep Front Left Driver SideSuperseded Part Number Window Regulator Front Driver Side ReplacementsSurface Finish SmoothProduct Fit Direct fitAttachment Type Bolt OnPerformance Part YesModified Item NoInstallation Instructions Included NoGear Material PlasticFrame Material Metal and PlasticMounting Hardware Included NoFitment Type Direct ReplacementWeight about 11 lbsPackage Size 22*19*5 inchFitment(Note) Verify this part fits your vehicle using the compatibility chartHousing Material Steel
WARNING: Cancer and Reproductive Harm - www.P65Warnings.ca.gov.
- Ordersprocessedwithin24-48hoursofpaymentverification.
- WeonlyshiptoconfirmedPAYPALaddresses.YourPAYPALaddressmustmatchyourShippingaddress.
- Theimagesshownarenottheactualitemandareforyourreferenceonly.
- Servicetransittimeisprovidedbythecarrierandexcludesweekendsandholidays.Transittimesmayvary,particularlyduringtheholidayseason.
- We accept payment via PAYPAL only.
- Payment must be made within 4 days of auction closing.
- S&H will be determined based upon the SHIP TO address.PLEASE NOTE: S&H dons not include duties,local taxes
You have 7 days to contact us and 10 days to return it from the date it was received. If this item is inyour possession more than 7 days, it is considered used and we will not issue you a refund or replacement. There are NO EXCEPTIONS!
- 12 months Manufacturer's Warranty for defective items (excluding items damaged and/or misused after receipt). Accessories come with a 3-month warranty.
- Defective items must be reported and returned to us within the warranty period (and in the original packaging, if possible).
- You agree to all of the above-listed policies upon bidding on and winning this auction!
- We maintain high standards of excellence (five stars review)and strive for 100% customer satisfaction! FEEDBACK IS VERY IMPORTANT TO US. We request that you contact us immediately BEFORE you give us neutral or negative feedback, so that we can satisfactorily address your concerns.
- It is impossible to address issues if we do not know about them!
Description
Our window regulator offer value without compromising quality. It with premium material and solid construction, ensures high strength and reliability. They direct fit -No missing holes, hardware or mounting brackets. It has been 100% tested for RPM, rotational direction, amperage and torque before shipment.
Highlights include
- Built to meet or exceed original equipment performance
- Simple electrical plug assembly, no wire splicing necessary
- High-quality steel and plastic compounds for greater durability
Your "Right Part" Checklist
Use the compatibility chart to identify your vehicle.
Visually compare the part you are replacing with our pictures.
Match reference numbers from the Item specifics section above.
Find the year,make, model, engine and trim in vehicle application to ensure.
Part Number
Replaces dealer part number:741-526, 68059644AA, 55360031AB, 55360031AG, 55360031AH, 55360031AJ, 55360031AM
Fitting for the following vehicles
2007 Jeep Liberty Front Left Ball Stud Style, Regulator Attaches To Metal Liftplate w/Spring Clip
2006 Jeep Liberty Front Left Ball Stud Style, Regulator Attaches To Metal Liftplate w/Spring Clip
2005 Jeep Liberty Front Left
2004 Jeep Liberty Front Left
2003 Jeep Liberty Front Left
2002 Jeep Liberty Front Left
Package
1x Window regulatorwith Motorin a box
Install the window regulator as follows:
Tools required for removal and installation of window regulator and motor assembly:
• Silicone spray lubricant
• Trim panel removal tool
• Pick
• Saddle cup assembly, tape, or wedge to hold window in place
• Flat-blade screwdriver or plastic pry tool
• 10mm socket or driver
• Phillips screwdriver
• Grease pencil or marker
Removal Instructions
STEP 1: Using a Phillips head screwdriver, remove the interior door trim panel retaining screw.
STEP 2: Using a pic or small fl at-blade screwdriver, remove the cover exposing an interior door trim panel attaching screw.Once the cover has been removed, use a Phillips head screw driver to remove the interior door trim panel attaching screw.
STEP 3: Using a trim panel removal tool, release the interior door trim panel retainers.
NOTE: The interior door trim panel retainers are about 8 inches apart from each other.
STEP 4: Once the interior door trim panel has been released, disconnect the interior door latch rod from the interior door handle.
STEP 5: Disconnect the power door lock switch assembly.
STEP 6: Remove the interior door trim panel.
STEP 7: Using a Phillips head screw driver, remove the three (3) door speaker attaching screws.
STEP 8: Disconnect the door speaker.
STEP 9: Remove the interior water vapor barrier.
STEP 10: Temporarily connect the power window master switch and lower the window glass to expose the two (2) window glass mounting bolts.
STEP 10a: Remove the two (2) window glass mounting bolts and manually slide the window glass into the up position. Hold the window glass in place with either saddle cup assembly, painter’s tape, or wedge.
STEP 10b: Disconnect the window lift motor connector.
STEP 11: Remove the bottom two (2) regulator attaching bolts.
STEP 12: Remove the upper regulator attaching bolt.
STEP 13: Once the window regulator attaching hardware has been removed, remove the window regulator assembly through the access hole.
Installation Instructions
STEP 1: Place the window regulator through the access hole.
STEP 2: Loosely mount the bottom of the window regulator into position.
STEP 3: Loosely mount the top of the window regulator into position.
STEP 4: Once the window regulator has been put into position, tighten the window regulator attaching bolts.
STEP 4a: Connect the window lift motor connector.
STEP 5: Manually slide the window glass down to attach to the window regulator.
NOTE: It may be necessary to temporarily connect the master power switch assembly to raise or lower the window regulator lift plate.
STEP 6: Install the water vapor barrier.
NOTE: Be sure to slide the interior door latch rod through the water vapor barrier.
STEP 7a: Attach the three (3) door speaker attaching screws.
STEP 8: Attach the interior door latch rod to the interior door handle.
STEP 9: Connect the power door lock switch.
STEP 10: Install the interior door trim panel. NOTE: Be sure to align all of the door trim panel retainers.
STEP 11: Install the interior door trim panel door handle bezel retaining screw.
STEP 12: Install the interior door trim panel door pull retaining screw.
STEP 13: Verify that the interior door trim panel is securely fastened and that the window regulator operates properly.
Warranty:
This product is covered by our1-yearwarranty.
If a failure occurs due to a manufacturing defect during the expected use, we will replace the part free of charge
WARNING: Cancer and Reproductive Harm - www.P65Warnings.ca.gov.
- Ordersprocessedwithin24-48hoursofpaymentverification.
- WeonlyshiptoconfirmedPAYPALaddresses.YourPAYPALaddressmustmatchyourShippingaddress.
- Theimagesshownarenottheactualitemandareforyourreferenceonly.
- Servicetransittimeisprovidedbythecarrierandexcludesweekendsandholidays.Transittimesmayvary,particularlyduringtheholidayseason.
- We accept payment via PAYPAL only.
- Payment must be made within 4 days of auction closing.
- S&H will be determined based upon the SHIP TO address.PLEASE NOTE: S&H dons not include duties,local taxes
You have 7 days to contact us and 10 days to return it from the date it was received. If this item is inyour possession more than 7 days, it is considered used and we will not issue you a refund or replacement. There are NO EXCEPTIONS!
- 12 months Manufacturer's Warranty for defective items (excluding items damaged and/or misused after receipt). Accessories come with a 3-month warranty.
- Defective items must be reported and returned to us within the warranty period (and in the original packaging, if possible).
- You agree to all of the above-listed policies upon bidding on and winning this auction!
- We maintain high standards of excellence (five stars review)and strive for 100% customer satisfaction! FEEDBACK IS VERY IMPORTANT TO US. We request that you contact us immediately BEFORE you give us neutral or negative feedback, so that we can satisfactorily address your concerns.
- It is impossible to address issues if we do not know about them!
Copyright ofignition-coil. All rights reserved.