When you click on links to various merchants on this site and make a purchase, this can result in this site earning a commission. Affiliate programs and affiliations include, but are not limited to, the eBay Partner Network.
Price: $44.00
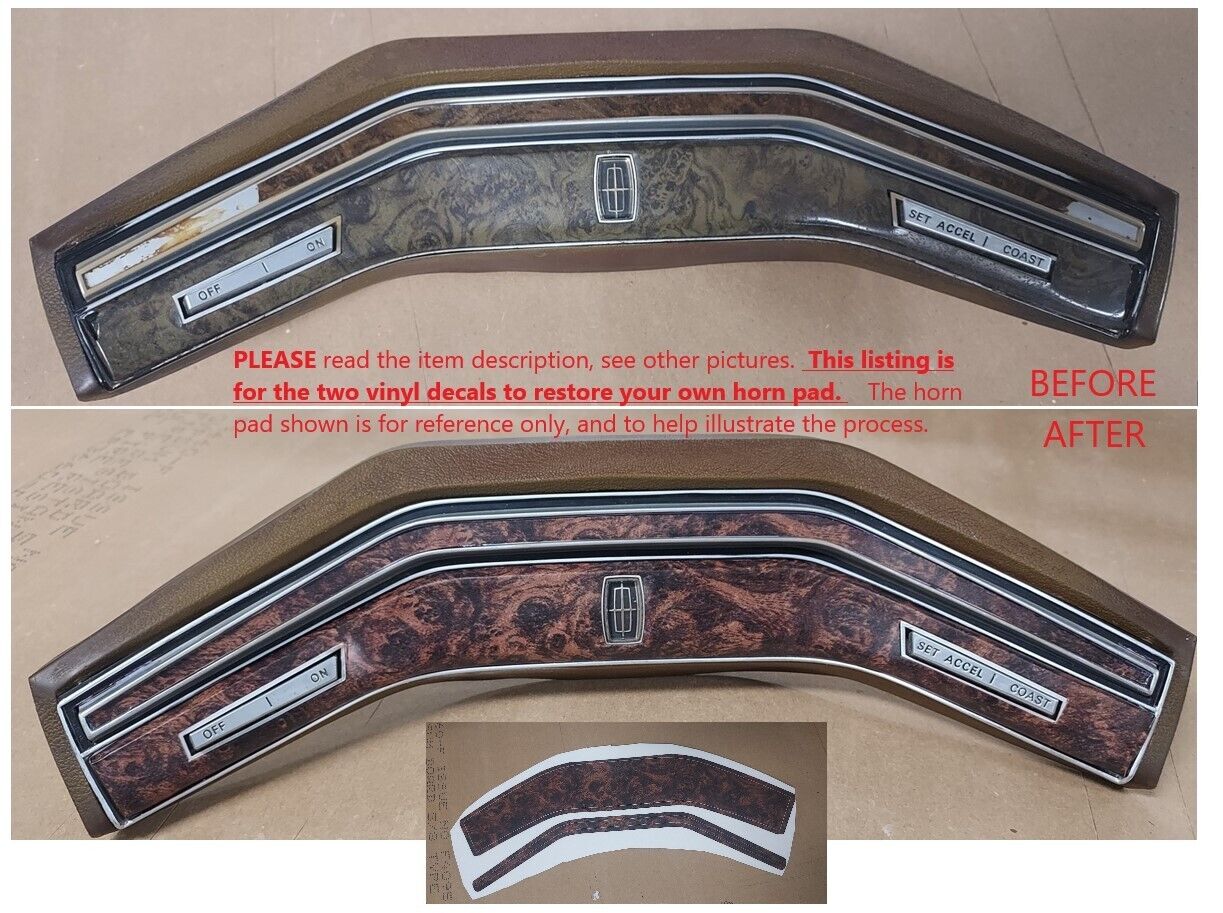
The horn pad assembly is pictured for reference and to help illustrate the restoration process - It is not included.For sale here are the two Burled Walnut vinyl wrap decals only, in order for you to restore your own horn pad. Note that the pictures show a Lincoln center emblem, the only difference between the Lincoln and Mercury models.
I will do the restoration work for you if youprefer, contact me for details.
The main picture showstypical color fading and trim plate degradation after 40+ years, even with an assembly in good shapeotherwise. Often the lower woodgrain sections can be cracked andcrumbling as shown, and this kit will solve that problem also.
This is a two-piece high quality decal kit for restoring the appearance of the1970's Ford Family full-size, two-spoke, deluxe steering wheel horn pad woodgrain panels; the thin hornbutton above, and the larger trim plate panel below that surrounds the cruise controlbuttons (also works fine for cars without cruise control). The woodgrain pattern is the genuine Ford burled pattern, NOT a generic look-alike.
These steering wheel horn pads were used on several Ford / Lincoln / Mercurycars, and Ford trucks, from 1975 - 1986. A few different woodgrain patterns were used - this one is called Burled Walnut. There is a separate listing for the same kit but with the Majestic Walnut pattern used on the 1977-1980 Lincolns only, also a correct pattern copied from original OEM parts.
The material is a 3M vinyl that is used for exterior automotive wraps. It isdesigned to be UV-fade resistant, durable, and flexible, able to follow most anyshape. It has just a bit of stretch capability without distorting that makes iteasy to fit exactly to flat or contoured surfaces. It also has just the rightamount of light reflection. I trialed several different materials and this oneis excellent for the application. Both decals are laminated with a satin clear layer for extra protection, and to get that proper sheen.
1. The horn pad is separated from the steering wheel with two screws removed fromthe back side, then unplug the electrical connectors.
2. Remove the cruise button surround by removing the four 5/16" speed nutsfrom the posts and gently pushing it forward and threading the wires throughthe hole in the center. Gently pry back the small plastic clips holding thecruise buttons in place and remove that complete button/harness assembly.
3.The pictures show the process in sequence, for when the damage on the ends is fairly small. Trim away any of the original woodgrain covering that is "sticking out" or just hanging on. Then overfill those areas with a plastic putty product. Once it is completely cured, sand down the excess to get back to the original shape, as shown. If the original woodgrain cover layer is more significantly damaged or missing, then I remove that layer completely which exposes holes, dips in the black plastic base which must be filled and smoothed similarly, a bit more involved. There may certainly be better techniques, and I am always open to feedback!
4. Clean the smoothed surfaces with alcohol before applying decals. Center the trim plate onto its decal and tape down one half to hold it securely in place. The shape of the decal will fitperfectly centered when applied "in 3D". Trim just a bit, roughly 1/8" to 3/16", of excess material. You want just enough material remaining to wrap over the edges firmly tothe backside. Too much left is a lot better than not enough...be careful here.
5. Remove the white backing from the half you're starting with, and start pressing thedecal onto the base's front face surface, starting at the center and workingoutward to the end. Get the front face surface done and smooth with no wrinkles before starting to wrap it around the edges.
6. It helps to cut small snips into the excess border material, every inch orso around the perimeter, especially where it curves, to make wrapping the overlay over the edges easier. You may also make snips at the edges of the cruise control button tabs to make that area come out neatly. Continue to wrap the edges over to the back side, pulling just a bit as neededto keep any wrinkles out. One of the pictures also shows the shaped cutouts that I usually make on the ends to make that part of the wrap easier. A pair of tiny scissors helps a lot with this. Fold in the top and bottom portions first, then the outer edge while holding it in tension. Trim as needed for nicely shaped corners.
7. Remove the other half of the white backing material, and repeat for the remaining half of the trim plate.
8. Use an exacto knife or similar to cut "X" shapes into the centerhole for the emblem, and the two cruise control buttons, corner to corner, andfold that material onto the back side also. Now you have a nice wrapped edgeall around, contoured to the exact shape, that will not lift and peel away, as with the original part.
9. Reverse steps to assemble the cruise buttons to the base, and the base tothe horn pad.
10. Lay the horn button overlay in place on top of the old one if it is completely intact, or remove the old horn button woodgrain completely if it is not. After making surethe surface is clean and smooth, get it perfectly centered and then tapeit down in place just off center as with the trim plate. I use electrical tape - it holds stronglyenough and releases nicely. It might look like the decal is a millimeter ortwo short of reaching the edge - don't worry, it isn't, hang in there.
11. Remove half of the backing and start applying, again working from centeroutward while holding a bit of tension in the decal with one hand and usingyour finger of the opposite hand to press and guide around the corner andtoward the end, keeping all as centered as possible between the raised perimeter. You will find that the edge reaches perfectly, and if you werepulling a little harder, could even come out slightly long in which case simplytrim to fit. You can regulate how hard to be pulling as you get closer to the end and can anticipate where it will land.
Any questions, please ask - I am sincerely happy to help.
Thank you!
Perry Bush